Work with Layer Mask
This guide shows you how to make use of image layer mask returned by TCMaskView
About layer masks
Layer masks are resolution-dependent bitmap images that are edited with the painting or selection tools. A layer mask controls the visibility of the layer to which it is added. You can edit a layer mask to add or subtract from the masked region without losing the layer pixels.
A layer mask is a grayscale image, so areas you paint in black are hidden, areas you paint in white are visible, and areas you paint in shades of gray appear in various levels of transparency.
To get more information about layer mask, check out the mask layers tutorial from Adobe Photoshop
TCMaskView delegate
When the user completes or exits from a TCMaskView, one or more functions in TCMaskViewDelegate will be called:
- tcMaskViewDidExit: is called after TCMaskView exits
- tcMaskViewDidComplete: is called after a popup TCMaskView completes
- tcMaskViewWillPushViewController: is called before navigation controller is about to accomplish TCMaskView and process to the next UIViewController
The layer mask is provided as the first parameter in those delegate functions:
class ViewController: UIViewController, TCMaskViewDelegate {
    ...
    // create and show a TCMaskView
    func presentTCMaskView() {
        let maskView = TCMaskView(image: image)
        maskView.delegate = self
        maskView.presentFrom(rootViewController: self, animated: true)
    }

    // delecate function, which will when TCMaskView is completed
    func tcMaskViewDidComplete(mask: TCMask, image: UIImage) {

    }
    ...
}
@implementation ViewController
...
// create and show a TCMaskView
- (void)presentTCMaskView {
TCMaskView *maskView = [[TCMaskView alloc] initWithImage:image];
maskView.delegate = self;
[maskView presentFromRootViewController:self animated:true];
}
// delecate function, which will when TCMaskView is completed
- (void)tcMaskViewDidCompleteWithMask:(TCMask *)mask image:(UIImage *)image {
}
...
@endProcess image using layer mask
Layer mask can be easily used to incorporate with other image editing frameworks.
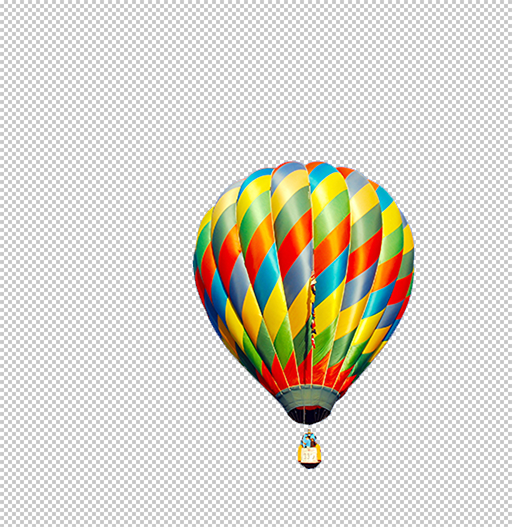
For the guides below, we'll use the following image and layer mask to show the examples.

Image
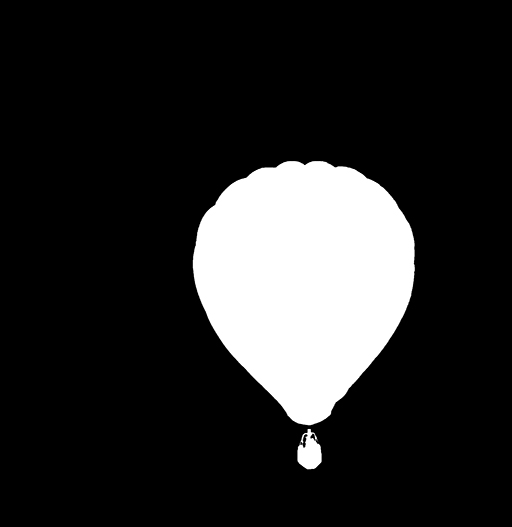
Layer Mask
TCMask class
TCMask is an encapsulation of image masking result from TCMaskView, it has the following properties:
- data: An array of 8-bits unsigned char, its length is equal to the number of pixels of the image in TCMaskView. Each element in data represents the mask value.
- size: The size of mask, which is equal to the size of the image in TCMaskView.
TCMask also provides some simple and easy to use functions to process layer mask with image, the following example cuts out the masked object from the image.
let outputImage = mask.cutout(image: image, resize: false)UIImage *outputImage = [mask cutoutWithImage:image resize:false];Which will generate the following result:
Cutout image
Integrate with other frameworks
TinyCrayon can be easily integrated with other image editing frameworks. Usually, if the framework requres an mask image as a parameter, you can just use imageOfGray or imageOfRGBA to create it.Integrate with Core Image
Core Image is an image processing and analysis technology designed to provide near real-time processing for still and video images.
The following code creates an image with the selected mask region to be colored and the background to be gray scale:
// Create a mask image from mask array
let maskImage = CIImage(image: mask.rgbaImage())
let ciImage = CIImage(image: image)

// Use color filter to create a gray scale image
let colorFilter = CIFilter(name: "CIColorControls")!
colorFilter.setValue(ciImage , forKey: kCIInputImageKey)
colorFilter.setValue(0, forKey: kCIInputSaturationKey)

// Use blend filter to blend color image and gray scale image using mask
let blendFilter = CIFilter(name: "CIBlendWithAlphaMask")!
blendFilter.setValue(ciImage, forKey: kCIInputImageKey)
blendFilter.setValue(colorFilter.outputImage!, forKey: kCIInputBackgroundImageKey)
blendFilter.setValue(maskImage, forKey: kCIInputMaskImageKey)

// Get the output result
let result = blendFilter.outputImage!
let outputImage = UIImage(ciImage: result)
// Create a mask image from mask array
CIImage *maskImage = [[CIImage alloc] initWithImage:[mask rgbaImage]];
CIImage *ciImage = [[CIImage alloc] initWithImage:image];
// Use color filter to create a gray scale image
CIFilter *colorFilter = [CIFilter filterWithName:@"CIColorControls"];
[colorFilter setValue:ciImage forKey:kCIInputImageKey];
[colorFilter setValue:0 forKey:kCIInputSaturationKey];
// Use blend filter to blend color image and gray scale image using mask
CIFilter *blendFilter = [CIFilter filterWithName:@"CIBlendWithAlphaMask"];
[blendFilter setValue:ciImage forKey:kCIInputImageKey];
[blendFilter setValue:colorFilter.outputImage forKey:kCIInputBackgroundImageKey];
[blendFilter setValue:maskImage forKey:kCIInputMaskImageKey];
// Get the output result
CIImage *result = blendFilter.outputImage;
UIImage *outputImage = [[UIImage alloc] initWithCIImage:result];
Output image
Integrate with GPUImage
The GPUImage framework is a BSD-licensed iOS library that lets you apply GPU-accelerated filters and other effects to images, live camera video, and movies.
The following code creates an image with the selected mask region to be colored and the background to be sketch effect:
// Create pictures
let picture = GPUImagePicture(image: image)!
let maskPic = GPUImagePicture(image: mask.grayScaleImage())!

// Create filters
let sketchFilter = GPUImageSketchFilter()
let maskFilter = GPUImageMaskFilter()
let blendFilter = GPUImageSourceOverBlendFilter()

// Chain filters
picture.addTarget(sketchFilter)
picture.addTarget(maskFilter)
maskPic.addTarget(maskFilter)
sketchFilter.addTarget(blendFilter)
maskFilter.addTarget(blendFilter)

// Get the output result
blendFilter.useNextFrameForImageCapture()
picture.processImage()
maskPic.processImage()
let outputImage = blendFilter.imageFromCurrentFramebuffer()
// Create pictures
GPUImagePicture *picture = [[GPUImagePicture alloc] initWithImage:image];
GPUImagePicture *maskPic = [[GPUImagePicture alloc] initWithImage:[mask grayScaleImage]];
// Create filters
GPUImageFilter *sketchFilter = [[GPUImageSketchFilter alloc] init];
GPUImageFilter *maskFilter = [[GPUImageMaskFilter alloc] init];
GPUImageFilter *blendFilter = [[GPUImageSourceOverBlendFilter alloc] init];
// Chain filters
[picture addTarget:sketchFilter];
[picture addTarget:maskFilter];
[maskPic addTarget:maskFilter];
[sketchFilter addTarget:blendFilter];
[maskFilter addTarget:blendFilter];
// Get the output result
[blendFilter useNextFrameForImageCapture];
[picture processImage];
[maskPic processImage];
UIImage *outputImage = [blendFilter imageFromCurrentFramebuffer];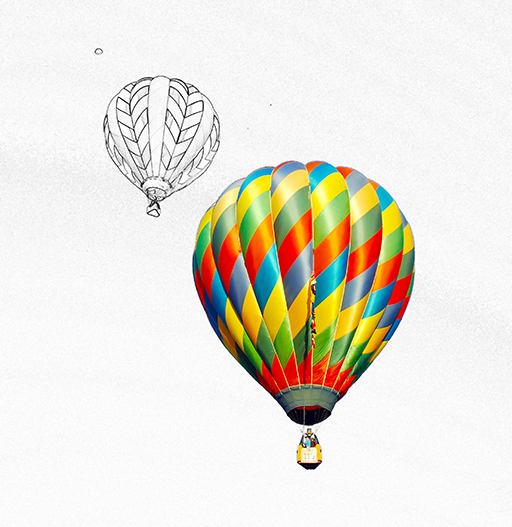
Output image
What's next
Check out TinyCrayon docs for more API reference details.
To see how to customize view mode or UI styles, check out the guide Customization.